Before we begin, I'd like to specifically thank 2 web tutorials from which I stole, I mean, borrowed, my code from.
The first author is Keitaki Rao from Chickpea:
http://www.chickpea-app.com/techblog/google-account-auth-for-appinventor
The second is the crew at Imagnity.com:
http://www.imagnity.com/tutorials/app-inventor/web-component-json-response-on-app-inventor
These two tutorials form the basis upon which the following code is made.
They both offer a download of their .aia project files freely to the public, so I don't feel bad for ripping them off.
On to the tutorial.
First, let's begin by describing the process of connecting with Google Drive.
There is an in-depth explanation here:
https://developers.google.com/accounts/docs/OAuth2InstalledApp
The process is also more simply illustrated in the diagram conveniently provided on that page for Google Developers.
First, the User and the App sends a request to the Google Servers, which is met with a response containing an Authorization code, another request is sent from the App to the Server containing the Authorization code, which is then met with another response with a pair of tokens. A third request is then sent to the Servers from the App with the token in order to finalize the Authorization process, in order to gain permission to view or change files on the User's Google Drive Account.
Preparation:
As described by the page, you will first require an account on the Google Developer's Console (https://console.developers.google.com) This is assuming you already have a Google+ or gmail account. If you have not created a project already, you will have to click on the Create Project button.
Once you have created and clicked on your project you will next need to enable 2 APIs for the purposes of this project. Google Drive, and Google+
Next up is the Credentials screen. Here you will have the option of creating a Client ID for a secure OAuth2 transaction.
This is the information you will need:
1. Now We Begin
These are the first global variables you must set in MIT App Inventor:
And your design screen should look something like this:
You will need a Login Button, a hidden Web Viewer, a TinyDB, a Notifier, a Clock, and at least 2 Web Components.
In order to start, you should initialize the screen and set the logic of the Login Button to the following code:
How did we get here, you ask? Well, if you'll refer to the OAuth2 link I provided (https://developers.google.com/accounts/docs/OAuth2InstalledApp) as well as the pretty chart from that page, you'll see that this makes up the first part of the request in a three part communication in order to authenticate.
Within that page it describes the format of the request, which should look something like this:
Which is exactly what information the string builder is compiling. First it defines the Authentication scope, as well as which APIs it is requesting the access to. Here you notice that we're already using 2 global variables from the Google Developer's Console. The Auth_Redirect_Url, and the Client_ID.
The Google Developers page also a lists a number of tags you can play around with, but for this example we will only use the two APIs we enabled earlier.
When the Login Button is clicked, the first arm of the request is completed:
What the Google Servers should respond with, should look something like this:
Luckily for us, the Authentication code is displayed right in the page title, which brings us to the next part, handling the first response from the server. You'll notice that in the previous part of our App Inventor code, we started a clock timer at the end of the function. This is presumably to handle a delayed response.
Here is the handling:
As noted earlier, the Authentication Code is right in the title of the URL response, so all this function is doing, is stripping away everything except for the Auth code, which we want, and is marked by the "code=" segment preceding it.
We call a procedure called get_access_token, which we will be working on next. Notice that the clock is disabled at the end of this function, and will never be used again. Once this function ends, the first pair of the request/response handshakes is complete.
Next is the get_access_token procedure, which as per instruction on the Google OAuth2 guide, should look something like this:
And so we build it using the following procedure, using the post function of the Web Component:
Fairly straightforward. The response should look something like this, with an access token, and a refresh token:
We will handle this response with the .GotText function of the Web Component object:
When this is done, the 2nd pair of the request/response handshake is complete.
Now all we have to do is extract the token from the response text from the server.
Both tokens are now saved in the TinyDB object.
Next we take a detour to obtain the User info from the Google people API, part of Google+. This is not part of the chart, but should be useful later on. Specifically, we need the username to get detailed listing information of the User's files on Google Drive. The request, based from the People search page on the Google Developers page, should look something like this:
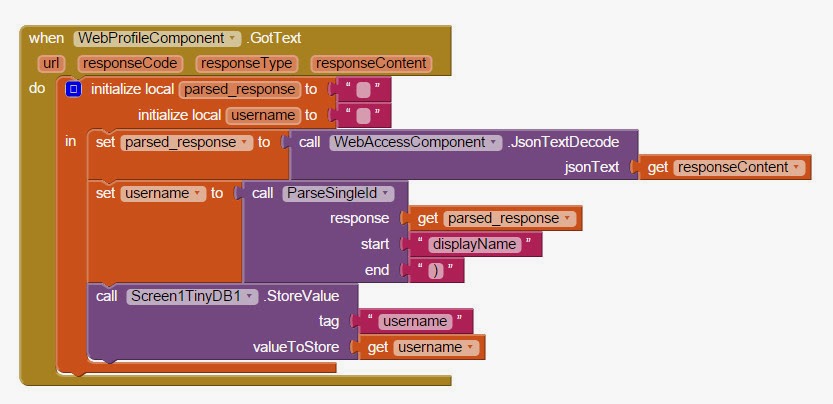
This is the function, triggered by WebProfileComponent.GotText, which handles the response:
The ParseSingleId procedure is a very useful one, which can be reused later whenever we're parsing a large amount of response data. It is especially useful when we're listing the file information of the User on Google Drive, but that's for another tutorial.
So, that's it for this tutorial. The last part of the diagram is still missing, but we have all the tokens and user information that we need to view, edit, or even create new files on Google Drive. That will be the topic of the next tutorial.


